Assignment 1: Pattern Studies
1. Set up a new document in Adobe Illustrator that is 20 inches wide by 14 inches tall.
2. Using RECTANGLES, ELIPSES, POLYGONS, AND STARS ONLY, create 6 pattern studies.
3. Your pattern studies should be 4 inches by 4 inches using only Black and White Stroke and Fills.
4. Keep an even 2 inch border around each pattern study.
5. Make 6 BLACK AND WHITE pattern studies based on the following concepts:
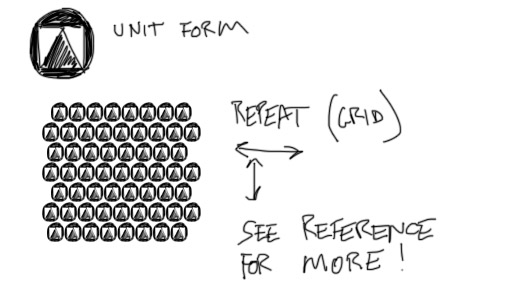
6. Before you start, make a simple "super unit" form to build into a pattern using repetition.
7. Follow the guidelines below to focus your patterns on an idea. (grids, rotations, scale shifts, grids, quanitity, and you-pick)
Units and Super-Unit forms
Wucious Wong defines a Super-Unit form as a complex form composed of a group of simple geometric figures. These figures are called “units”.
Pattern Guidelines
- #1 experiment with GRID STRUCTURES to create patterns (NO use of Illustrator's Repeat Cmd.)
- #2 experiment with ROTATION to create patterns (NO use of Illustrator's Repeat Cmd.)
- #3 experiment with SCALE CHANGES to create patterns (NO use of Illustrator's Repeat Cmd.T)
- #4 experiment with GRID STRUCTURES to create patterns (WITH use of Illustrator's Repeat Cmd.)
- #5 experiment with QUANTITY(WITH OR WITHOUT Illustrator's Repeat Cmd.)
- #6 experiment with EXPERIMENT WITH YOUR OWN PATTERN (No restrictions)
6. You can use White Rectangles to create borders around your patterns.
7. Save your file named firstname_lastname_shapes.ai
*see example below for some ideas
** all 6 pattern studies will be on the same document (20 x 14 inches)

Parameters:
No Effects, Transparency, Filters, Brushes, Variable Stroke Widths, Gradients, Color etc.
Keep shapes as primitive geometric shapes (ellipses, squares, stars, polygons)
No shapes other than primitive shapes
Objectives: Adobe Illustrator
A. Document Set Up, Guides, Grids, Workspace
1. Select tool
2. Primitive Shape tools
3. Rotate tool
4. Transform tool, Transform panel
5. Stroke and Fill
6. Stroke and Fill color
7. Constraints
8. Repeating
9. Align tool
Criteria For Grading and Evaluation:
Basic Includes |
art board size |
| |
4 inch square areas for pattern studies |
| |
2 inch borders |
| |
black and white stroke and fill colors |
| |
primitive shapes used for pattern studies |
Idea |
pattern investigations listed above (grids, rotations, scale, repeat command) |
| |
repetition of "super-units" using scale, rotation, position, translation (applied to grids, rotations, scale, line, quantity, and individual) |
Effort
(visual production)
|
Ambition with production - ambition with what you set out to do
Ambition with effort - how much you put into your idea and how much time you spent
Ambition to delivery - how much attention to detail and level of development and finish |
10 pts |
Total |
What to Turn in:
1. name your AI file:
firstname_lastname_shapes.ai
2. Submit your file to SIU Desire to Learn > HERE
-Log into your D2L Account (Click on the Drop Boxes Module and follow the instructions)
Assignment 2: Pen Tool Primer
Guidelines:
Download and open the following AI file.
Pen Tool Primer file
Parameters:
- Using the PEN TOOL ONLY, trace the simple outlines.
- Use the recommended number of anchor points.
- Make your lines curve smoothly and accurately according to the sample.
- Use rulers and guides if necessary.
Objectives: Adobe Illustrator
- Pen Tool
- Select Tool
- Direct Select Tool
- Anchor Point Tools
Fun Practice Game
The Bezier Game
Criteria For Grading and Evaluation:
|
accuracy of traced shapes |
|
efficiency - using the recommended number of anchor points to make shapes |
| |
smoothness - anchor point control handles to smooth lines |
| |
completion - all shapes are completed and submitted correctly |
10 pts |
Total |
What to Turn in:
1. name your AI file:
firstname_lastname_primer.ai
2. Submit your file to SIU Desire to Learn > HERE
-Log into your D2L Account (Click on the Drop Boxes Module and follow the instructions)
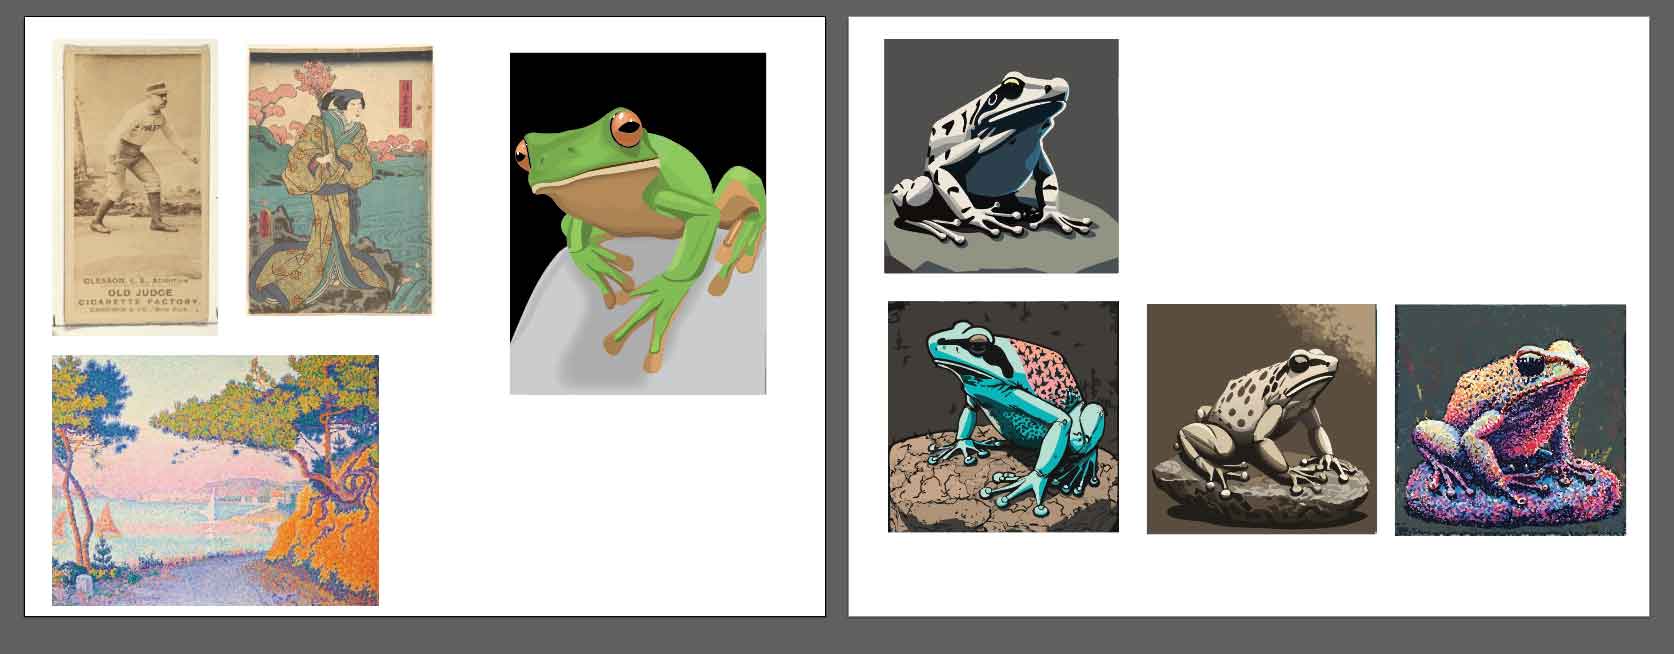
Assignment 3: Animal
Using an existing digital photograph (bitmap) of an animal, reptile, or insect, you are to remake the image with layered shapes in Illustrator as a vector illustration.
Animal Selection:
- Choose an animal that has a strong, directional light source. Low light and diffuse light that doesn't provide shadows won't work well
- Choose an animal with short fur, no fur, or smooth skin.
- Choose an animal with some type of form to its body (butterflies and many birds won't work)
- Choose an animal that has light colored features (an all black animal will not work well)
- Choose an animal image that is framed well (the animal takes up the frame and we can see its whole body)
- Choose an image with good resolution (1200 px width or height minimum)
Getting Started
- Pay special attention to the image as shapes rather than textures and lines.
- When looking at the image, break it down from the largest shapes to smallest shapes. (don't start with the feathers, spots, hair, bumps, etc.)
- Think of creating your animal as if it's a stack of cut pieces of colored paper.
- Think of creating your animal like a topographic map (topology). The biggest pieces will be at the bottom of the stack.
- Use the topology of your animal by breaking your shapes down based on cross-contour lines.
(you won't be drawing the lines in your file, but visualize them as you look at your animal)
Guidelines:
- File size should be 7.5 inches by 10 inches.
- Color palette limited to 5 BASE COLORS. You can add tints (white) and shades (black) to each of these BASE COLORS.
- No Stroke Colors, Filters, Effects, Brushes, or Gradient, or Transparency are to be used.
- NO OPEN PATHS OR LINES
- Solid Color Only. ALL OF YOUR SHAPES WILL BE CLOSED PATHS (NO LINES)
- Save your file and name it firstname_lastname_animal.ai
- As an option, you may use a maximum of 3 shapes with a feathered edge.
Objectives: Adobe Illustrator
- Paths and Shapes (pen tool)
- Color Panel, Swatches Panel, Color Guide Panel
- Layers
- Composition
- Pen Tool
- Hand-Eye Coordination
Requirements:
- A minimum of 3 layers (all layers must be labeled)
- All paths must be closed.
- All colors in artwork must be saved in the Swatches Panel
- Simple background to describe the animal's environment.
- File named correctly and put into the Drop folder
- As mentioned in class, original source file must be embedded.
Criteria For Grading and Evaluation:
basic includes |
art board set up (10 inches by 7.5 inches)
use of at least 3 layers with labels.
color limited to 5 base colors plus tints (white) and shades (black)
all colors used are saved to the swatches panel
background illustration- indication of animal's environment
|
design |
shapes - shape contours are observed from original image
form - illustration of animal is volumetric and 3D
light - use of light and shadow on animal's form
color - use of 5 colors plus tints and shades |
craft |
shapes - illustration is constructed of simple shapes from largest to smallest
shapes - pen tool usage - points, curves, control handles are refined and developed
shapes - pen tool used to make shapes with the fewest points.
|
effort |
image selection - animal appropriate for project goals, composition,
Ambition with process - effort in use of shapes to create illustration
Ambition to detail - shape construction is carefully observed and reacreated
Ambition to completion -
time devoted to completly recreate original including details |
| |
10 POINT DEDUCTION FOR USING:
BRUSHES (IE. OPEN PATHS)
VARIABLE STROKE WEIGHTS
EFFECTS OR FILTERS
GRADIENTS |
30 pts |
Total |
What to Turn in:
- name your AI file:
- firstname_lastname_animal.ai
- Submit your file to SIU Desire to Learn > HERE
Assignment 4: Postage Stamp
Using your illustration of an animal completed for assignment 3, compose and set a mockup for a Postage Stamp following these guidelines:
Objectives: Adobe Illustrator
- Type tools
- Pathfinder tools
- Alignment tools
- Art board tool
- Color Modes
- Scale Tools - (scale strokes and effects preference)
- Stroke Tools
- Drop Shadow and Effects
- Appearance Panel
Stamp Requirements: Focus
- Animal Illustration - include your complete illustration from Assignment 3.
- Create a serrated border with Stroke and Drop Shadow (really examine the stroke width and appropriate size for the serrated edge of a real stamp) that creates the illusion of a real stamp.
- Use the Pathfinder Tool to cut your serrated border into the stamp shape to make a single shape for the stamp's "paper"
- Add Text for the following elements:
- Animal Name
- Country
- Year
- Monetary Value and Currency
- Convert all text to Outlines
- Label all layers.
- Two versions of your stamp (see below) saved and submitted as Illustrator files.
Presentation Requirements:
- Art board size = 7.5 inches by 10 inches (landscape orientation)
- 2 versions of stamp - large and small
-
Small version size:
- Overall Size = longest side will be 2.0 inches.
-
Large Version Size:
- Overall Size = longest side will be 6.5 inches.
- Title - (Bottom Right Corner in 8 pt type):
- Postage Stamp Mock-up
- AD 219 Summer 2024
- First Name Last Name
- Save your file and name it firstname_lastname_stamp.ai
Parameters:
- No Photoshop Effects, SVG Filters, gradients,
- No Illustrator Brushes or added Appearances
Criteria For Grading and Evaluation:
basic includes |
art board set up
stamp mock-up shape using Pathfinder for construction
required type elements converted to outlines
2 versions of stamp- see size requirements above
submitted - file saved and submitted to MyCourses with correct name |
design |
type - consistency of type style - color, weights, etc.
type - scale and hierarchy - sizes, order of importance
type - spacing and alignment
|
| |
stamp - scale of serrated edge
stamp - effects (shadow)
stamp - alignment and spacing |
effort |
Ambition- how much you set out to accomplish
Ambition to delivery - how much attention to detail
Ambition to delivery - time devoted inside and out of class
Ambition to delivery -
level of finish and attention to detail |
10 pts |
Total |
| |
|
critique |
ready to present at the beginning of class |
| |
provide construcive feedback during class |
| |
|
10 pts |
total |
What to Turn in:
- Name your AI file: firstname_lastname_stamp.ai
- Submit your file to MyCourses > HERE
- Log into your MyCourses Account (Click on the Drop Boxes Module and follow the instructions)
Assignment 5 - Appliance
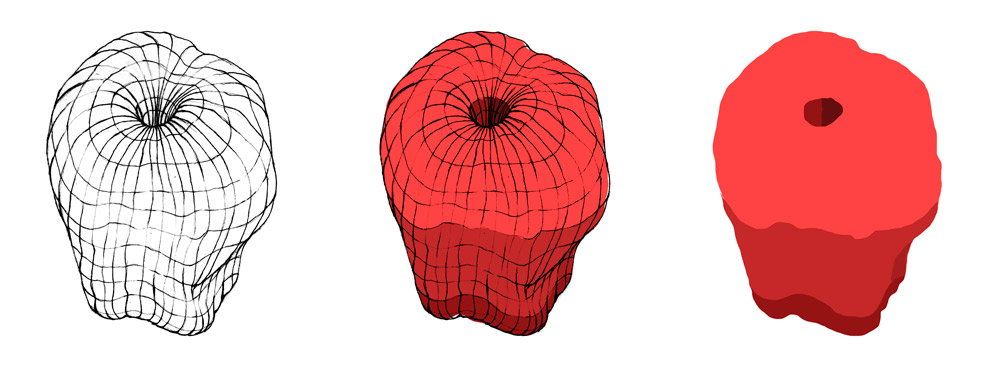
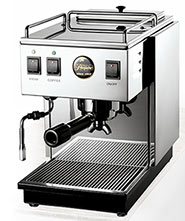
Starting with a black-and-white image of a house-hold appliance or hand-held power tool, you are to recreate the image in Illustrator using shapes, gradients, and tracing. Your Image will be "placed" in Illustrator as a template to trace. Final illustrations should be very representational of the original and use gradient fill colors to recreate the original light source, textures, surfaces, and form. Pay close attention to shadows, highlights, and perspective.
Objectives: Adobe Illustrator
- paths and shapes
- gradients - linear, radial, freeform,
- layers
- transparency
- pen/pencil tool, blob brush,
- perspective
- shadows and highlights
- other tools in illustrator - free transform, puppet warp, blend, warp, mesh, distort, etc.
Parameters:
-
No Brushes, Filters, or Effects.
- Edge Feather ONLY may be used on a maximum of 4 paths
- No colors...grayscale only
- No Image Trace, live paint
- Minimum of 5 layers (labeled)
- Placed file should be embedded in your document
Presentation:
- Art board should be 7.5 inches by 10 inches.
- Title - (typed at the bottome right of artboard in 8 pt type)
- Appliance Illustration
- AD 219 Summer 2024
- First Name Last Name
- Save files and name them firstname_lastname_appliance.ai
Criteria For Grading and Evaluation:
basics |
art board set up
placed image file embedded in document
5 layers used with labels
source image resolution
|
focus |
completion of outlined criteria using Adobe Illustrator
use of black and white gradients
quality image selected based on assignment objectives
level of detail and level of completion
time and effort devoted |
design |
use of gradients to simulate light source and texture
use of black and white gradients to build a full value range
shape construction creates volume and form
|
craft |
skill with manipulating digital components (points, curves, control handles, gradients, layers)
appropriate handling of digital components and files
|
creativity |
image selection - composition, challenge factor (based on guidelines from instructor)
inventive and independent thinking used to solve problems
|
30 pts |
Total |
| |
|
What to Turn in:
- Name your AI file: firstname_lastname_appliance.ai
- Submit your file to SIU Desire to Learn > HERE
- Log into your D2L Account (Click on the Drop Boxes Module and follow the instructions)
Assignment 6 - Photomontage
Collage Def:
The word Collage is derived from the French; "to glue" or to "stick together". Different types of collage have been explored by artists that include various materials.
A Photomontage uses photographs or parts of photographs.
Different approaches have been used to categorize collages. From the following reading, create a Photomontage that displays the TAMED CHAOS approach.
Step 1
- Search and collect images from the Metropolitan Museum's Open Access Library
- To save image in Google Chrome > Right + Click > Choose > Save Image As
- Collect at least 15 source images to include in the Photomontage. Save ALL IMAGES IN A SINGLE FOLER.
Step 2
- Using Photoshop and the tools for making selections, SELECT elements from their backgrounds to manipulate on different layers in Photoshop.
- COPY selections to your clipboard and PASTE into your new document.
- Make your collage in a NEW DOCUMENT that is 7.5 inches by 10 inches (resolution 300 pixels/inch)
- USE at least 15 different source images in your collage.
- REUSE one of your items at least 5 times.
- SAVE your file as firstname_lastname_collage.psd with ALL LAYERS SEPARATE
- Understanding file types - TIFF, JPG, PSD
- Photoshop Selection Tools - Marquee, Lasso, Color Range, Object selection, Quick Mask, Select and Mask
- Layers Panel
- Transform Objects (Move, Rotate, Scale)
- Resolution, File Size, Saving
Objectives: Collage Idea
- LAYER objects on many layers to create overlap
- Make clean, natural selections of each objects that are smooth and natural looking.
- Organize your elements into some sort of arrangment.
Parameters
- Prohibited items: ANYTHING THAT DOES NOT COME FROM THE MET OPEN ACCESS
(ie. Brushes, Gradients, Paint, Solid Shapes, Type, Text, Textures ,Lines, Paths.,etc. )
- No Filters or Effects or Adjustment layers - leave source images in their natural state
- Maintain the integrity of the objects so they aren't distorted. Allow the imagery to represent itself as you found it.
Criteria For Grading and Evaluation:
focus |
7.5 x 10 inch document - 300 ppi |
|
use of ALL Met Open Acces Images |
| |
use of at least 15 objects |
| |
use 1 element a minimum of 5 times |
| |
submitted - file sized, saved and submitted to D2L with correct name |
design |
clear strategy for organizing and arranging objects |
| |
use of color, shape, space, and other 2D elements of design to support composition |
craft |
demonstration of accurately selecting elements from source images. (simple, random selections will not be acceptable for all sources included in the collage) |
|
demonstration of accurately scaling, rotating, and moving elements from source images |
| |
demonstration of correct use of Photoshop tools, layers, file types |
creativity and ambition |
demonstration of a develped theme with consistent use of imagery to support a theme |
|
demonstraton of time and effort invested in exploring and developing a theme |
| |
demonstration of a variety of visual elements and a deliberateness to how they are used (how elements are selected from source images) |
| |
demonstration of attention to details |
| |
5 POINT DEDUCTION FOR USING ITEMS NOT FROM THE MET OPEN ACCESS WEBPAGE. |
10 pts |
Total |
When your photomontage is complete:
- In Photoshop, from the Image Menu, choose Image Size
- Make sure the box for Resample Image is checked.
- Choose Pixels for your Width and Height.
- For Pixel Dimensions, set the longest side to 2000 pixels
- Save your file with a new name so you don't overwrite your original.
- Submit your new PSD file to MyCourses.
What to Turn in:
- name your PSD file:
- firstname_lastname_photomontage.psd
- Submit your file to MyCourses > HERE
- -Log into your MyCourses Account (Click on the Drop Boxes Module and follow the instructions)
Assignment 7 - Image Correction
1. Download the Image Correction files from D2L under:
ASSIGNMENT RESOURCES > ASSIGNMENT 7 > IMAGE CORRECTION
2. Follow the instructions for each file (the instructions appear as a layer IN the file)
Objectives:
This assignment will introduce the concept of Non-Destructive editing in Photoshop for image correction and repair. For additional reference on class demos, check out the Photoshop User Guide for the following tools specifically the use of Adjustment Layers:
Levels Adjustment layer
Curves Adjustment layer
Color Balance Adjustment Layer
Hue and Saturation Adjustment Layer
Brushes and Blending Modes:
Blending Modes
Criteria For Grading and Evaluation:
focus |
Completion of outlined criteria, meeting objectives, following directions, time devoted. |
| |
level of completion for each image |
| |
scaling and image size corrections |
| |
files zipped and submitted as one folder |
craft |
Skill in execution. Proper use of digital components and files |
| |
use of photoshop repair tools |
| |
naturalness and quality of image repairs |
design |
demonstration of the elements and princples of design as they relate to the assignment |
| |
use of color, texture, value |
creativity |
Original, inventive and independent thinking |
| |
|
35 pts |
5 Pts for each completed image (parital completion will not earn any points) |
What to Turn in:
1. When finished, put all of your files in one folder and name it color_correction_yourname
2. Right Click (Control Click) on the Folder and choose > Compress
2. Submit your COMPRESSED file to SIU Desire to Learn > HERE
-Log into your D2L Account (Click on the Assignment 7 Module and follow the instructions)
Assignment 8 - Digital Matte Painting
Overview
Using the same family of tools from the Image Correction assignment and other compositing techniques, you will create a digital matte painting from original source images.
"A matte painting is a painted representation of a landscape, set, or distant location that allows filmmakers to create the illusion of an environment that is nonexistent in real life or would otherwise be too expensive or impossible to build or visit." -Wikipedia
What is a matte painting? YouTube video
• The goal of your images are to be convincing and realistic and look like movie stills (not cartoons, or graphics).
The Making of Mountain Meadow YouTube timelapse digital matte painting
Focus
1. Start by picking an outdoor location on campus, Carbondale, or your community that includes some form of architecture or other man-made structure.
2. Using a DSLR camera, your Phone using Adobe Lightroom, or other camera that can shoot in RAW, collect high-quality, RAW images of your location and other elements you want to use as the starting scenery for your matte painting.
3. EXTEND YOUR ORIGINAL LOCATION to create a conceptual matte painting. Choose from one of the concepts below:
- Fantastical/Otherworldly weather phenomena
- Post Armageddon Ruins/Devastation
- Post Apocalypse/Overtaken by nature
- World of the future
- Sacred/Mystical Ritual Site
- Explosion of Magic/Energy Emmision
- Material World/ High End/Fashion Society
- Cotton Candy/Bubble Gum/Barbie World
4. Examples to avoid
- Any type of sea creature, dolphin, whale, etc. jumping out of an empty lake/pond/water
- Simply adding an animal to the scene
- Any type of Bigfoot walking through your scene.
- Simple sky replacement (although this could be ONE part of your composite)
- Simply adding water to the foreground (althought this could be ONE part of your composite)
5. Gather ALL source material (RAW files of your location, RAW files of textures and other elements you want to include, etc.), for compositing.
5. You can use up to 5 Generative Fill prompts as additions to the scene (the original location should still be the focus)
6. Set up your NEW document in Photoshop and paste compositing items into them
- Document size: 4K resolution (3840 x 2160 px)
- RGB Color (you can change your color profile after you start the document)
- 72ppi
7. Blend elements with a variety of techniques including using Layer Masks, Blending Modes, Cloning, Painting, Erasing, Filtering
8. You will submit ALL your original source images including the original RAW file.
9. Print a color copy of the matte painting on letter-sized paper.
Tips and Tricks
- Play with scale: it's free to make things large and small even when it doesn't make sense.
- Play with repetition: if it's easy to copy something 10 times, why not try 100 times.
- Play with inside and outside space: there's no rule.
- Play with gravity: things can go up that shouldn't.
- Play with form: something that starts out as one thing can morph into something else
FOCAL POINTS for convincing blends
• Light - what direction is the light coming from, what color is the light, does the light cast shadows, do your objects have shadows,
• Color/Value - what is the color temperature for each image being used. Unify the darkest darks and lightest lights for each element.
• Focus - try to match the focus to create a believable depth of field. Things farther away will be in a softer focus.
• Scale - look at scale and perspective when compositing different source material.
Images you can use
YOU MUST START YOUR MATTE PAINTING FROM A LOCATION YOU PHOTOGRAPH LOCALY THAT INCLUDES SOME TYPE OF MAN MADE OBJECT OR STRUCTURE. From your original location, you can use any of the following types of files in your matte painting:
- Your own photos and textures taken with a digital camera.
- Original materials that you scan yourself.
- Images from Adobe Stock (ALL STOCK IMAGES USED IN THE FINAL VERSION MUST BE SUBMITTED -10PTS. FOR EACH ELEMENT NOT SUBMITTED)
- UP TO 5 GENERATIVE FILLS IN PHOTOSHOP
- Digital painted elements created with your own Photoshop brushes and textures.
guidelines
- All stock images should be of high resolution and good quality.
- The format of your final images should look like photographs or film stills (not posters, business cards, cartoons)
- NO ADDITIONAL INTERNET IMAGES.
- YOU MUST START WITH A RAW FILE FROM YOUR OWN CAMERA.
- The requirement is to EXTEND YOUR OWN LOCATION, not to use some other location and add your composited elements.
- A simple sky replacement or adding water to something will not be a sufficient demonstration of creativity. You will not earn an A or B by simply changing the sky.
Objectives: Adobe Photoshop
1. Camera Raw
2. Compositing techniques - layer masks, blending modes, blur effects, light effects, etc.
3. Photoshop Layer Styles
4. Brushes and Blending modes
5. Layer Comps
6. Photoshop Actions
7. HDRI images
8. Color Management and printing
9. Generative Fill and Generative Expand AI prompts in Photoshop
LINKS TO POPULAR PHOTOSHOP TECHNIQUES
20 Matte Painting tutorial - links from Vanderlay Designs
Other good free Photoshop Tutorial pages - Envato Tuts, Geek At Play, PSD Tuts, IAmag, Artstation
Paid tutorial sites with some free - Phlearn, Pluralsight ,Udemy
links to photography resources
Basic photography handout courtesy of Corey Tester
Criteria For Grading and Evaluation:
| creativity |
integration of images together from various sources is original |
| |
original location is transformed in an original way |
| |
location selection - use of an original location to be expanded upon through additional composited elements. |
| craft |
final composite blends original images into one image seamlessly |
| |
use of Photoshop masking, layers, adjustments, blending tools, blending filters |
| |
image quality - camera RAW original source image |
| |
image quality - Adobe Stock source images |
| composition |
use of light and dark (contrast) - remember to think like a photographer. You need to have some kind of light in order to create a balanced composition |
| |
manipulation of scale, perspective, space |
| |
manipulation of light, texture and color |
| focus |
amount of time and effort spent |
| |
level of completion - integration of different materials together |
| |
level of integration - transformation of original location into a new scene. |
| |
submitted PSD files with layers and original source files. YOU WILL LOSE A FULL LETTER GRADE IF YOU DON'T TURN IN ALL SOURCE MATERIAL AND A LAYERED PSD FILE. |
30 pts |
Total |
|
|
| |
presented project |
| 10 pts |
participated in discussion |
|
|
What to turn in:
1. Put your finished PSD (with layers), Adobe Stock images used, and ANY source images used in one folder.
2. Compress the folder into a .ZIP file
3. Name the folder landscape_yourname
4. Right Click (Control Click) on the Folder and choose > Compress
5. Submit your file to MYCOURSES
Extra Credit - Pick One
Choice 1 - Illustrator Text to Vector
Using the Animal Illustration as an example, use Adobe Illustrator's Text to Vector to create variations of your animal illustration in various styles.
Steps:
- Create a new File in Illustrator with 2 Artboards: 7.5 inchs by 10 inches each.
- Copy and Paste your completed Animal Illustration into one Artboard
- Find 3 style reference images from online and place them into the same Artboard (make sure they are embedded in the file)
- Using the Text To Vector Panel - create a version of your animal using only text prompts.
- Using the Text to Vector Panel and the Reference Asset, create your animal illustration 3 more times with a refernce to each of the different style images
Evaluation
Steps |
artboard set up - 2 artboards |
| |
copied and pasted original animal illustration |
| |
3 placed reference files - embedded |
| |
1 text to vector - from scratch |
|
2. text to vector - style reference 1 |
|
3. text to vector - style reference 2 |
| |
4. text to vector - style reference 3 |
|
5. Completed video attendance (complete viewing of video) |
If All steps are completed |
10 pts. (no points awarded for missing steps) |
What to turn in:
1. Name the file text_to_vector_yourname
2. Submit to D2L
Choice 2 - Adobe Firefly
create a personal symbol - medalion - crest
- Within the Creative Cloud App - launch Adobe Firely to enter the Text to Image generator.
- Create a text prompt that generates an object of personal significance (as an object, at the end of your prompt enter ",isolated on a white background".
- Exeriment with the text entered to narrow your object down and refine the AI results.
- IMPORTANT: When you are satisfied, copy and paste your text prompt into a word doc or text file.
- In Adobe Illustrator, create some type of simple shape (black and white vectors) to upload as a Structure Reference in Adobe Firefly.
- In Adobe Illustrator - export your structure reference as a JPG.
- Use the Structure Reference to regenerate your object
- Experiment with text prompts to refine your AI results
- Download your favorite result
Evaluation
Steps |
1. Adobe Firefly Text Prompt - saved copy of text prompt (word doc. etc.) |
| |
3. Adobe Illustrator Reference File |
| |
4. Downloaded Image of your AI generated image |
|
5. Completed video attendance (complete viewing of video) |
|
10 pts. (no points awarded for missing steps) |
What to turn in:
1. A text file that contains you final text prompt used in Adobe Firely
2. Your Illustrator file used as a structure reference
3. Your final AI result from Adobe Firefly
2. Submit to D2L